| |
Bringing up the find object system
Description: How to start up and control the systemTutorial Level: BEGINNER
Contents
Running the fully autonomous system on PR2
Setup and build the system.
Firstly checkout the package to somewhere and enter the folder as below:
roscd find_object
If roscd can not find the package, you should probably add the package path to ROS_PACKAGE_PATH.
Secondly, make sure the setup.sh script exist in the folder and setup the environment simply by:
source setup.sh
This script setups the environment automatically and defines some useful functions such as: robot-info to show the environment information, robot-uri <MACHINE> to setup the master URI, robot-pkg <PATH> to add the package path to ROS_PACKAGE_PATH, etc.
Thirdly, checkout additional packages (the latest version of point_cloud_perception_experimental, graph_mapping, point_cloud_perception) required by the system as:
robot-setup
Notice that some of these packages are on the experimental stage so the svn path may change from time to time. You can checkout and build them by yourself if some error shows up.
Finaly, build the system without the stage simulator by:
make
or you can also use the rosmake tool to build the packages:
rosmake table_boundary_detector stage_msgs find_object_msgs find_object_actions find_object_planner find_object_executive
Bring up the robot and run the system.
To run the system, you need to bring up the robot first. Then, you can run the navigation stack so that the robot can move around given a pose in the map.
roslaunch find_object_actions pr2_2dnav.launch
The navigation stack is used by the move action in our package. You may want to run other actions used by the planner: firstly, bring up the table_clutter_detector node that is used as wide_sense;
roslaunch table_clutter_detector detector.launch
secondly, bring up the pr2_tabletop_manipulation node that is used as narrow_sense;
roslaunch pr2_tabletop_manipulation_launch pr2_tabletop_manipulation.launch
finally, bring up nodes for other actions.
roslaunch find_object_actions find_object_actions.launch
After bringing up all actions, you can run the executive as below:
roslaunch find_object_executive find_object_pr2.launch
If you do all things above without any error message, you can test the planner by:
rosrun find_object_planner planner
Configure the planner.
To make the planner do useful things, you need to provide a config file and run the planner with it:
rosrun find_object_planner planner -c <PATH>/<NAME>.config
Before starting the planner with a config file, you can run the planner in a test mode by:
$ rosrun find_object_planner planner -t -c <PATH>/<NAME>.config

[ INFO] [time]: Wait for the map data.
[ INFO] [time 1, time 2]: Create POMDP model with N states.
[ INFO] [time 1, time 2]: Compute the Transition Function.
[ INFO] [time 1, time 2]: Compute the observation function.
[ INFO] [time 1, time 2]: POMDP Model complete.
[ INFO] [time 1, time 2]: Ready to take commands.

help

* exit | quit : quit the test mode.
* state : print the current location.
* move <state> : move to location <state>.
* wide <state>  : wide sensing at location <state>.
* narrow <state> : narrow sensing at location <state>.
* pose
* save <file>
* tables
* map

state

[ INFO] [time 1, time 2]: Robot state: k
 [ x y z | x y z w ]
If everything looks fine, you can type a command state to see if the planner prints the right state for the robot.
The config file contains some hardcode poses that the robot can search for. We use two types of poses: static_pose and dynamic_pose. The static_pose defines a open area where no objects will be. The dynamic_pose defines a normal position where objects may locate, e.g. a position around the target table. An example of the config file is:
# pose [ position | orientation ]
static_pose [ x y z | x y z w ]
dynamic_pose [ x y z | x y z w ]
We also provide two useful options for debuging purpose: none_object_states and unreachable_states which are easy to be understand by words.
# option <STATE IDS>
none_object_states 0 1 2 3 4
unreachable_states 2 7 8 9 10
You can find more examples of config files by checking out the following folder:
roscd find_object_planner/conf/
Test the planner and see the result.
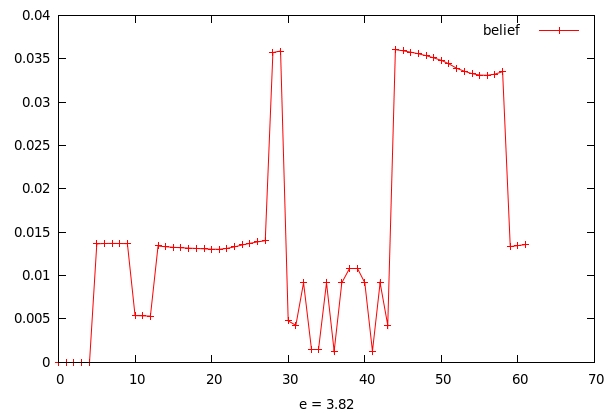
When running the the planner, you can see a pop-up window shown the current belief state: 
The X-axis represents the locations where the objects may show up and the Y-axis represents the probability distribution. At each decision cycle, the planner will update the belief and flash the window.
Using the stage simulator with the planner
To run the simulator, you need to setup the environment by:
source setup.sh
then build the system with the stage simulator:
make && make stage
After that, you can run the roscore:
roscore
and the executive:
roslaunch find_object_executive find_object_stage.launch
If everything looks right, you can try the planner by:
rosrun find_object_planner planner -c <PATH>/<NAME>.config
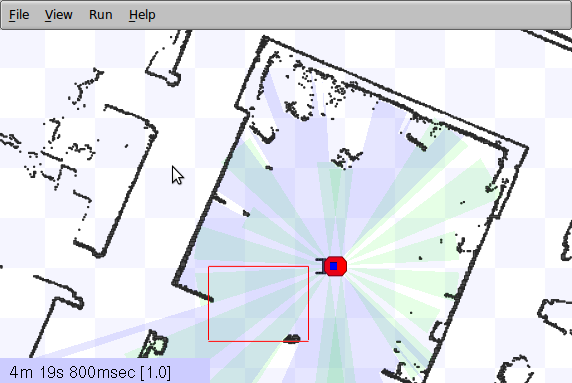
You should see a robot (the red box) moving around in the stage window: 
In the default setting, there is no object in the simulated environment. The robot moves around in order to minimize the uncertainty as quickly as possible based on its observation model. Now you can design your own sensing, moving and grasping actions in the simulator. Example codes about how to write actions for the stage_extensions package are given in the find_object_actions/src/stage_action_manager.cpp file.
To customize the environment such as adding objects, please refer to the official stage site. You also need to add observing signals for each object in the wide and narrow sensing actions located in the find_object_actions package:
   1 /*
   2  * In: find_object_actions/src/wide_sense_node.cpp
   3  */
   4 void WideSenseNode::StageExec(const WideSenseGoalConstPtr& goal)
   5 {
   6   // Lock the action.
   7   boost::mutex::scoped_lock lock(act_lock_);
   8
   9   bool success = true;
  10   result_.objects.clear(); // Clean up previous results.
  11
  12   // Get an instance of the stage action manager.
  13   StageActionManager& stage = StageActionManager::instance();
  14
  15   // For an observed object.
  16   find_object_msgs::ObjectInfo obj;
  17   // You need to specify:
  18   //   obj.sense_state : the location id.
  19   //   obj.object_pose : the object pose.
  20   //   obj.sense_prob  : the likelihood.
  21   obj.sense_action = find_object_msgs::ObjectInfo::WIDE_SENSE;
  22   obj.object_type = find_object_msgs::ObjectInfo::OBJECT_VALID;
  23
  24   // Publish some feedback.
  25   server_.publishFeedback(feedback_);
  26
  27   // Add the object.
  28   result_.objects.push_back(obj);
  29
  30   // Publish the result.
  31   if (success) {
  32     ROS_INFO("%s: Succeeded", action_name_.c_str());
  33     server_.setSucceeded(result_);
  34   } else {
  35     server_.setAborted();
  36   }
  37 }
  38
  39 /*
  40  * In: find_object_actions/src/narrow_sense_node.cpp
  41  */
  42 void NarrowSenseNode::StageExec(const NarrowSenseGoalConstPtr& goal)
  43 {
  44   // Mostly the same as the wide sensing above except:
  45   obj.sense_action = find_object_msgs::ObjectInfo::NARROW_SENSE;
  46 }
Visualization tools

- What is visualized in rviz
- Explain the gnuplot visualization of the belief state
- How to teleoperate using the keyboard interface


